Search This Blog

Friday, October 31, 2014

Capturing continued – building a fully functional demo

Another way of using the capturing features of Roxy is for building a demo quickly. For instance by generating a basic search app using the Application Builder, capturing that with Roxy, and then republishing it again after customizing it in every possible way you like. I gave a live demonstration of doing that in the MarkLogic User Group Benelux meetup 'Stop horsing around with NoSQL — How to Build a NoSQL Demo to Impress Your Boss'. This article gives full details on that demo.

Capturing and redeploying an Application Builder app basically comes down to the following steps:

  1. Create and deploy a Roxy REST project
  2. Use Roxy MLCP features to ingest data
  3. Use Roxy to deploy the analyze-data tool
  4. Create indexes using the analyze-data tool
  5. Create an App-Builder project for the content db of the Roxy project
  6. Run through the App-Builder wizard and deploy
  7. Use Roxy capture to capture the app-builder project
  8. Customize the app-builder code
  9. Redeploy to the Roxy project

And that is it. Roughly 7 steps to build a fully running demo, and then you can customize it any way you like, and redeploy as much and anywhere you like.

I’ll run through some details briefly, point to other blog articles of mine that are relevant, and wrap up with links to code, data and recordings of the live demo.

Other capture parameters


My previous blog article ‘Capturing MarkLogic applications with Roxy’ discusses capturing MarkLogic applications in general. It also mentions creating a new Roxy project, and various commands useful for capturing an Application Builder application.

In addition there is one other previously not mentioned capture flag that could be of interest. It is another way to capture configurations, but not all of them at once. Instead it just captures databases and servers matching the current Roxy project. Just use --ml-config instead of --full-ml-config:

./ml local capture --ml-config

This capture command runs faster as it is capturing much less, and you can often find the settings you are looking for easier, as the resulting ml-config file is much smaller. It actually allows targeting specific databases, and servers using extra parameters --databases and --servers:

./ml local capture --ml-config --databases=App-Services,Extensions,Fab --servers=App-Services

Loading data


Using MLCP features of Roxy was discussed briefly as well in my previous article. MLCP allows ingesting data directly from compressed archives, which is very convenient. You can also apply a transform while ingesting. The demo material contains runnable examples of both. Below just a little example of how such a command-line could look like:

./ml local mlcp import -input_file_path ../sample-data/horse-racing/ -input_compressed
-transform_module /ingest/ingest-events-with-geo.xqy -transform_namespace http://marklogic.com/demo

Analyzing data


The analyze-data tool is described in one of my earlier blog articles ‘Analyze your data!‘. Just a very crude tool, and far from flawless, but it can often be useful to get a jumpstart with it, just to get you going quickly.

Customizing app-builder projects


A brief word on customizing app-builder projects: if you intend to push the changes back into the modules database generated by the wizard itself, then make sure to put any customizations into the /application/custom/ folder. Not that there is much reason to push files back there if you can push them to anywhere with Roxy.

Doing so makes sure not only that you can go back to the wizard, make some changes, and redeploy, but also that you can recapture it with Roxy. Roxy will refresh the files in the src/ folder of Roxy, but will leave src/application/custom/ untouched. That means you can go back and forth between the wizard, and your own customizations as many times as you like!

The demo material


The demo material consists of:


The cheatsheet contains a brief intro, and a long list of all commands and steps you need to go through to run the entire demo yourself. Note that you need to go down on some slides to not miss steps!

The cheats are comprised of a set of various files. It would have take too much time to type everything myself live. The full demo already took about one and half hour with all the cheats.

The latter three provide all of the pieces of data that I used for the demo. I use the Geonames country info for a crude way to show a geospatial map with markers. The horse racing data is the core information. The triples are used to pull in extra info from DBPedia, and use that to add some semantics to the demo.

The recordings


You can watch the recording of the entire live demo with the following two links (we had a break roughly half-way). The quality is not perfect, but it should be understandable:


Have fun!

Thursday, October 9, 2014

Capturing MarkLogic applications with Roxy

Ever wanted to automate deployment of an existing MarkLogic application? Or regretted that you didn’t start off with Roxy for a MarkLogic project? The capture feature of Roxy will help with that!

I was recently asked to migrate a large database with data from one demo server to another. That is a simple task with the MLCP copy command. It even allows you to add collections, permissions, migrate to a different database root, etc. Unfortunately, I was asked to not only migrate the database, but the associated app servers as well, and impose a permission structure that allowed access to the data from a REST api instance. I decided to capture all relevant details in a Roxy project, and use that to automate deployment to the target environment.

Initializing a Roxy project


What you need first is an empty Roxy project structure. I’ll be assuming a project name myapp, running against MarkLogic 7. Get hold of the ml script if you don’t have it yet (you can download it from https://github.com/marklogic/roxy/tree/dev), and run the following command:

ml new myapp --server-version=7 --branch=dev --app-type=rest

This will create a Roxy project in a subfolder called myapp. It takes the dev branch of Roxy to utilize the latest cutting edge features, which we will need for the capture functionality that we are going to use here. It also creates a REST-type project, which gives you the emptiest Roxy project structure you can currently get with the ml new command.

Setting up environments


The next step is to add details about the relevant environments. In my case it concerned a development, and a production environment, so I used the pre-existing dev and prod environment labels. You can add your own ones as well. Just edit the environments property in deploy/build.properties. Create a environment-specific properties file. For dev you create a deploy/dev.properties. I typically put the following lines in such a file:

user=gjosten
password= 

app-port=8058
xcc-port=8059

content-forests-per-host=3

dev-server=mydev.server.com

Roxy will ask for the password if you keep it empty. Note: make sure that the name of the server property matches the environment. So it is dev-server for dev.properties, but prod-server for prod.properties.

Capturing ml-config


Once this is done, you are ready to take the first step in capturing MarkLogic settings, and code. Just run the following command:

./ml dev capture --full-ml-config

Replace ‘dev’ with the appropriate environment. The above command will create a new file named deploy/ml-config-dev.xml. It will contain a list of all app servers, databases, amps, users, roles, etc from the specified environment. You don’t want to bootstrap that, and luckily Roxy normally ignores the new file. Go into this file, and isolate all parts that are relevant for your application. Copy these over to deploy/ml-config.xml.

You probably want to replace the default parts generated by Roxy, but put them next to each other first. Roxy can use placeholders to insert values from the properties files. If you matched your project name with (partial) names of databases and app servers, you could decide to copy some placeholders over. One useful case could be to use app-port and xcc-port placeholders to aim for different ports per environment. Add more properties to the properties files, if you have additional app servers.

You could in theory replace the entire ml-config.xml with the captured ml-config, but usually that is not advisable. In case you do start off with the captured one, make sure to remove the XML processing-instruction at the top.

Testing ml-config


A large benefit from Roxy here is that you can easily do some dry runs against a local VM, or your own laptop. Run the following command to create app-servers, databases, and anything else you selected on your local environment:

./ml local bootstrap

Tweak the ml-config until bootstrap runs flawlessly. Then open the Admin interface, and verify everything looks complete and running correctly. Once here you are ready to bootstrap the target environment. That is just a matter of running bootstrap against a different environment.

Capturing modules and REST extensions


Just capturing and deploying the ml-config will likely not result in a fully functioning application. It very likely depends on additional code, like modules or REST extensions. Roxy provides two additional capture functions to get hold of those. If you have a more traditional application, not using the more recent REST api, you can run this:

./ml dev capture --modules-db=mymodules

Replace ‘mymodules‘ with the appropriate modules database name. All files in that database will be written to the src/ folder.

If your app is in fact a REST api instance, like applications generated with the App Builder, use this command instead:

./ml dev capture --app-builder=myappserver

Replace ‘myappserver’ with the name of the app-server that is the REST api instance. This will capture modules into the src/ folder, but also isolate REST transforms, REST extensions, and REST options into the rest-api/ folder.

Roxy by default assumes there is just one project-specific modules database. There are ways to deploy multiple sets of sources to different modules databases. But you might consider capturing those in separate projects. That is probably easier.

Testing deploying modules


You are close to having reproduced an entire MarkLogic application with just a few commands! Test the capture of modules and REST extensions by deploying them locally:

./ml local deploy modules

This will deploy both src, and all REST artifacts. After this you should be able to go to the newly created app servers, and have running applications! Repeat above against the target environment to get them up and running there as well.

Copying documents


Last step in the process if of course copying the contents of the document databases, and maybe also schemas, and triggers. MLCP is a very useful tool for that. You can either use separate MLCP export and import. You can use ml {env} mlcp for that! Or use MLCP copy to transfer directly between source and target. Unfortunately, you can’t use ml {env} mlcp for that (yet)..

Good luck!

Thursday, June 19, 2014

Analyze your data!

Now that I am part of the MarkLogic Vanguard team, I am regularly facing data sets that are unknown to me. Time is essential, particularly within this team where we often need to create a working demo in matter of weeks, sometimes days. The shape, and quality of the data often plays an important role. Knowing what kind of information is hidden in the data, allows using that within the demo. This applies not only to Vanguard, and demos, but applies to everyone, and every project in which data plays an important role.

I created a little MarkLogic REST extension that has helped me get a good, first impression from XML data sets quickly, and helps create an initial set of indexes in MarkLogic as well. It is available free of charge: https://gist.github.com/grtjn/1aba4eb364de9268fb5f.


Intro


The idea for such a tool rose years back, in the first years working with MarkLogic. I wasn’t working for MarkLogic back then, but the situation was similar. I often faced (relatively) unknown data sets, and had to ‘dig in’ to get acquainted with them. Documentation was (and is) usually lacking, or not yet in possession. A good understanding of the data at hand, can help a lot with for instance assessments, time estimates, making educated guesses whether (complex) transformations will be necessary or not, etc…

I also felt that creating indexes in MarkLogic was rather cumbersome. We use Roxy (http://github.com/marklogic/roxy) a lot within Vanguard. No surprise the two founders of that project are the lead-members of Vanguard. It provides a convenient way to provide index configuration (and many other MarkLogic settings) in XML, and push those with a single command. But you still have to write the index definitions yourself, often with a lot of repeated, and unknown namespaces, and such. I’d rather have a little tool to help me with that.

Why a REST extension? We tend to use JavaScript on top of the MarkLogic REST-api. I therefor packaged the tool as a MarkLogic REST extension. I also deliberately kept it single-file, to make it an easy and lightweight drop-in.

Deploying the tool


There are various ways to download and deploy the REST extension. To get you going:
After that you:
  • Copy the downloaded file into the Roxy folder for REST extensions, and deploy it:

    cp analyze-data.xqy rest-api/ext/
    ml local deploy modules

  • Or use Curl (replace myuser, mypass, and 8123 with appropriate values):

    curl --anyauth --user myuser:mypass -X PUT -i -H "Content-type: application/xquery" -d@"./analyze-data.xqy" http://localhost:8123/v1/config/resources/analyze-data'
You can now access it with http://localhost:8123/v1/resources/analyze-data (again, replace 8123 with the appropriate value).

Running the tool


The tool does various counts. The first part does counts over the entire database, which can take a while, depending on the size of your database. The latter part takes a random set of (by default) 20 files, and performs analysis on those. The final part allows creation of indexes.

When you open the tool (have a minute patience, it will be doing all sorts of counts for you!) you will see something like this:


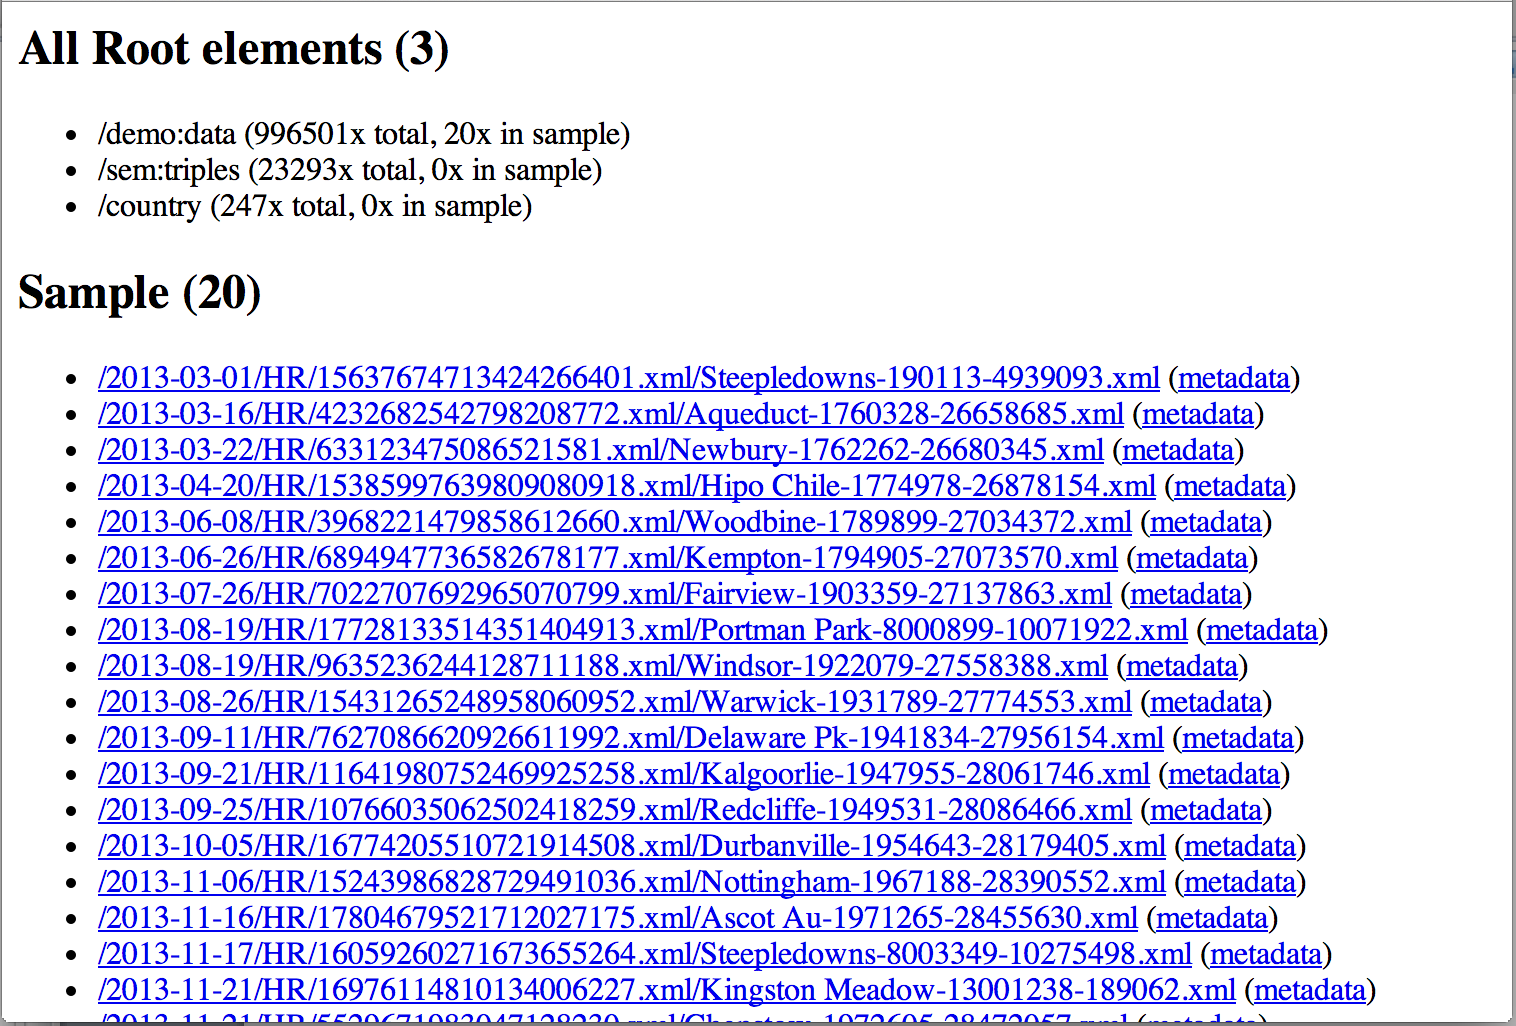
It immediately reveals various details. It gives counts of total number of documents, and counts for each of the main document types supported by MarkLogic: XML, Text, and Binary. It also provides a full list of discovered collections (requires collection-lexicon to be enabled), as well as top-1000 directories (requires uri-lexicon to be enabled), giving doc counts for every entry it lists. The last global count that is done is by root element, see next image.


Sample analysis


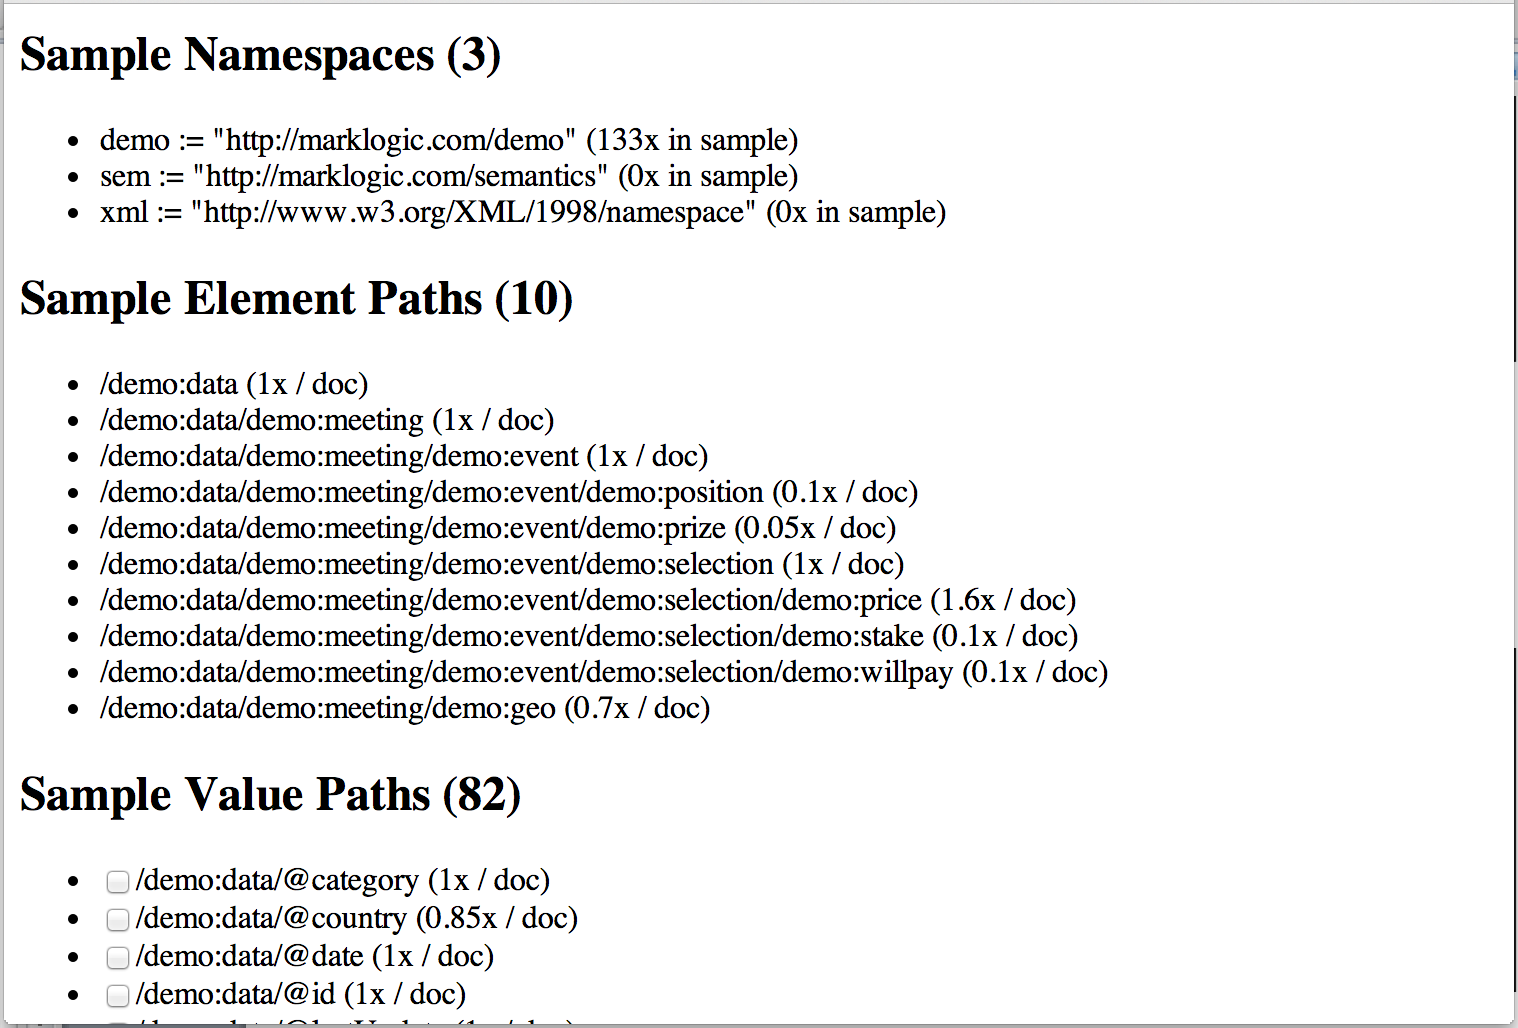
Based on the randomly chosen sample set, it provides insight into namespaces known to the system, and occurring within the sample set, a list of unique element paths, and a list of unique paths to any element or attribute containing character data (‘value’ paths). Each path is accompanied with an averaged count.


Element path counts can be useful to look for container elements that qualify for. High numbers high in the tree are usually an indication for that.

Value path counts can be useful to investigate data completeness. If for instance a certain attribute occurs much less often on an element than other attributes, then either it is an attribute to mark special cases (useful to know!), or it is an indication that your data source is providing incomplete data. The latter typically occurs when you are receiving data from multiple (independent) sources.

Note: empty elements and attributes are excluded from value paths at the moment.


Indexes


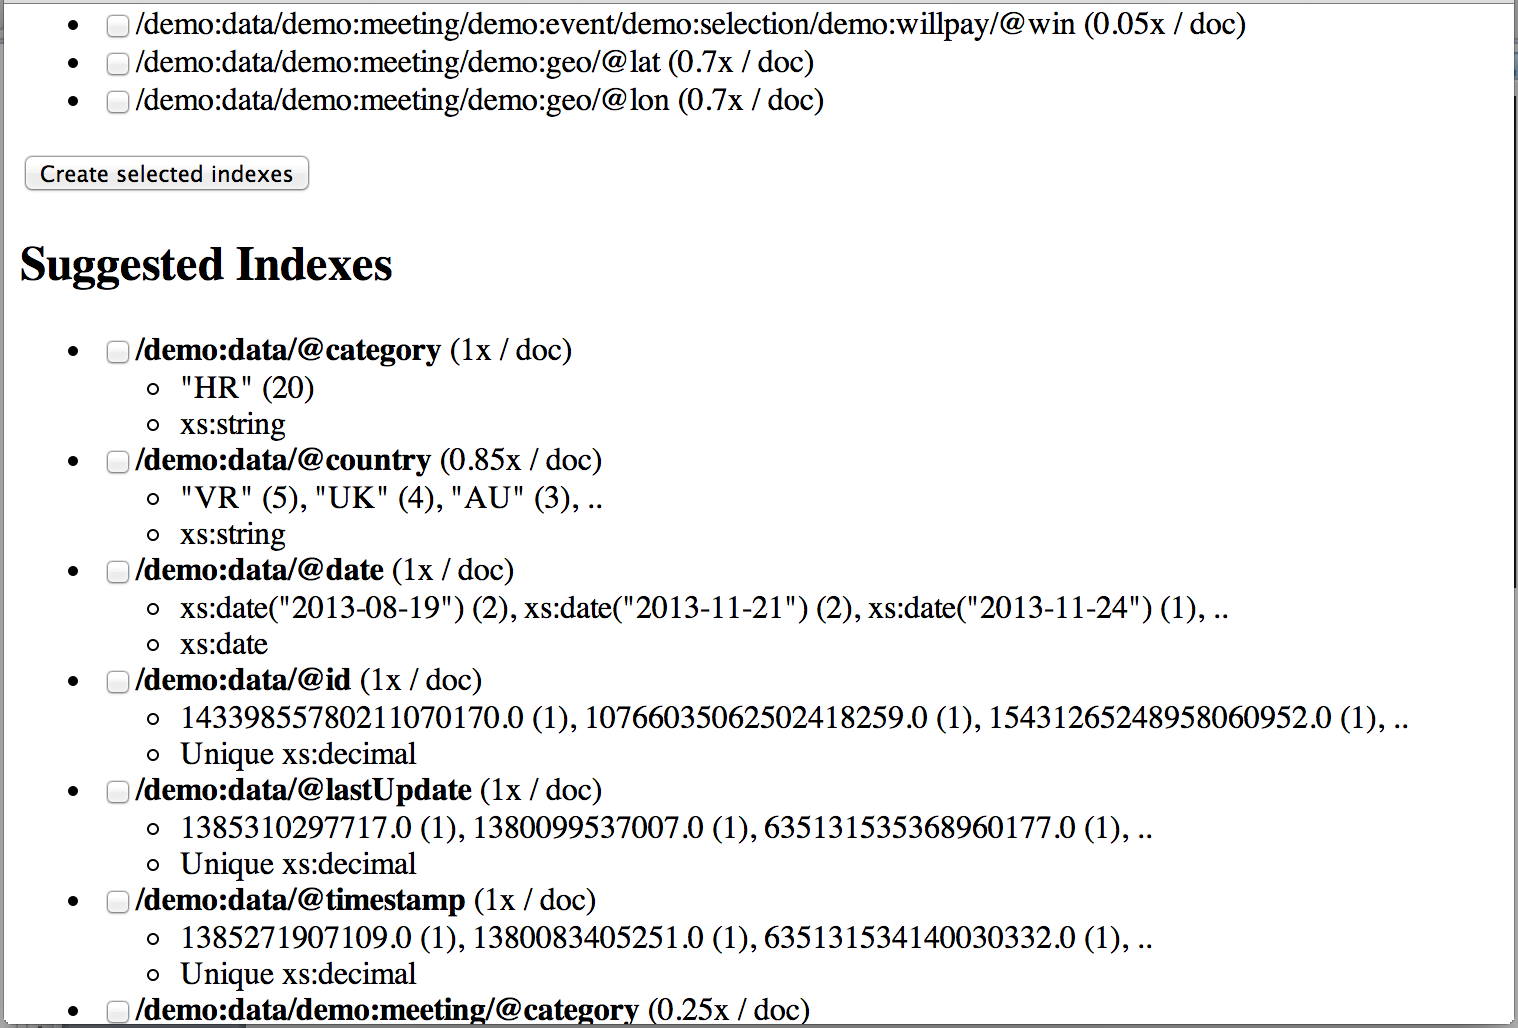
The last part is most interesting though. Based on the value paths from the sample set, it evaluates each path across the sample set, takes first 50 values of each, and displays the top-3 values of each. It also guesses the data-type of each, based on the top-1 value.


There is a checkbox displayed next to each value path (also applies to the Sample value paths section!). Simply mark the paths that appear worth indexing to you, and scroll down to the Create selected indexes button. This will create element and attribute range indexes for you. There code also contains functionality to create path indexes for you, but the MarkLogic App-Builder currently doesn’t support those, so I made the other ones the default.

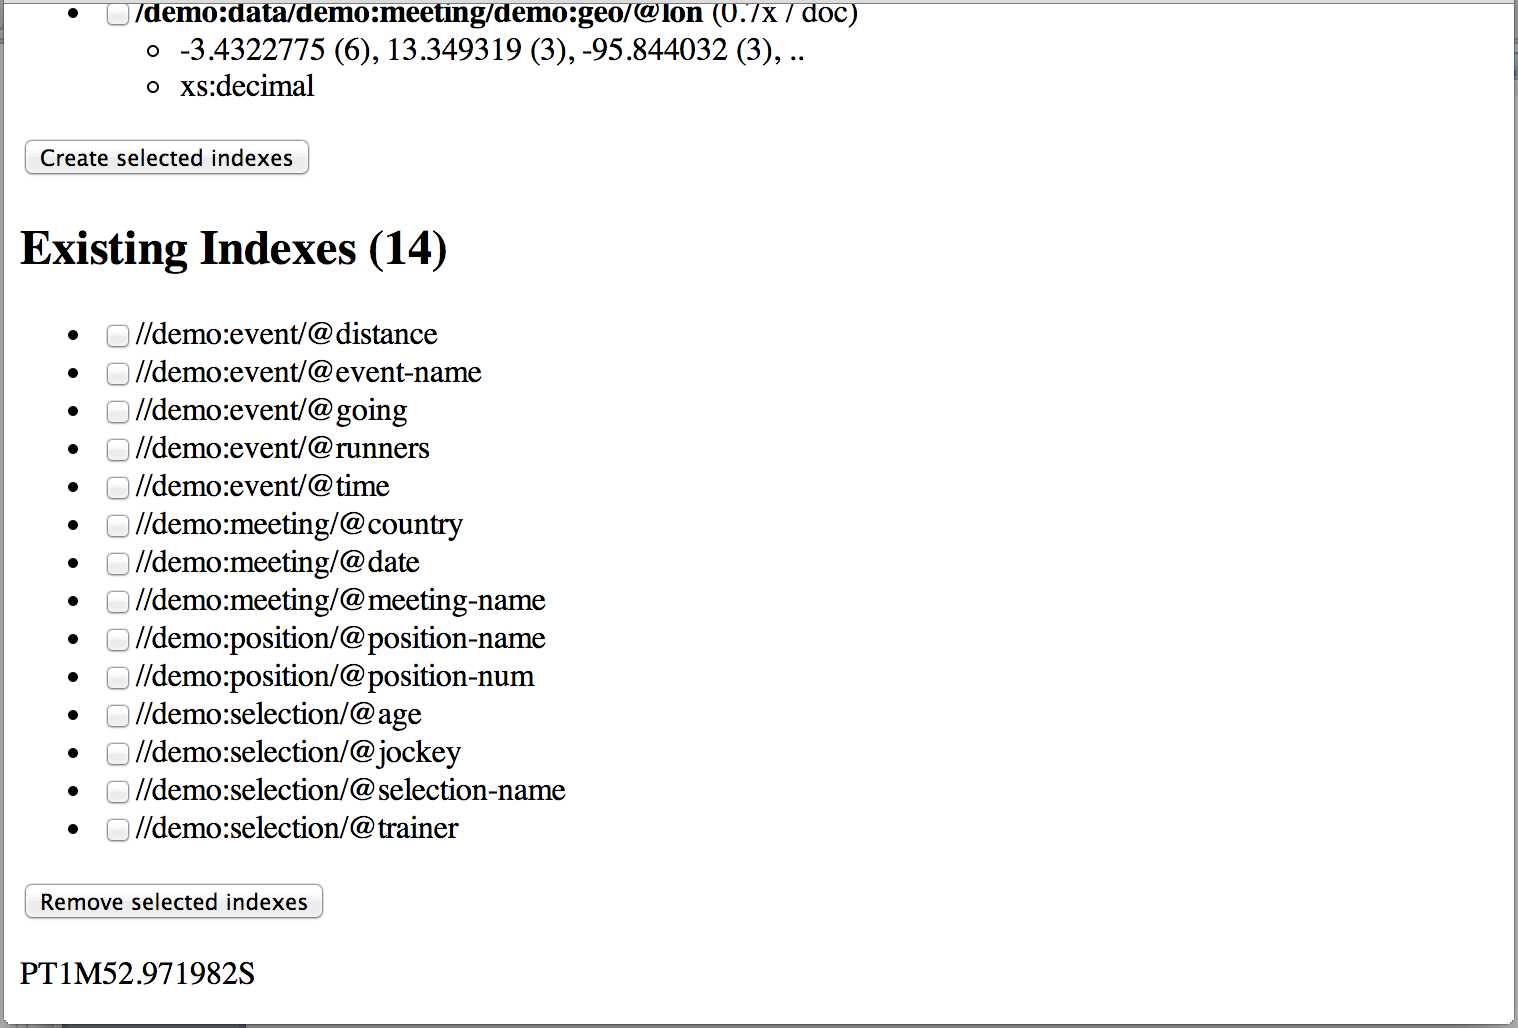
All the way down a list of existing indexes are shown. There are checkboxes next to these as well, to allow removing them.


The last line of the page displays the ‘elapsed-time’ printed as xs:dayTimeDuration.

Monday, April 14, 2014

Vanguard here I come!

Some may have heard the news: I joined MarkLogic as of first of April. No joke! To be more precise, I joined the MarkLogic Vanguard team. The name for the team is derived from the military meaning:
“The vanguard is the leading part of an advancing military formation.” http://en.wikipedia.org/wiki/Vanguard
It is a rather popular word. Wikipedia lists the name being used for ships, aircrafts, and satellites. But also for company names, schools, sports, and political parties. Not to mention the numerous books, movies, and toys that have Vanguard in their name or title. Google actually suggests the term is derived from the French word Avant-garde, which only adds to the classiness of the word.

About the team: the team operates as international team supporting MarkLogic Sales Engineers around the globe to create compelling demos and proof of concepts. That puts the team close to the frontier. But the team also has the ambition to set an example, to not only make the demos look good, but also write compelling code. Even more reason it deserves such a name!

The team uses the RObust XQuerY (ROXY) Framework to accelerate their work. To describe it very briefly:

“Roxy is a lightweight XQuery application development framework. It includes:
  • Application configuration management
  • A lightweight mVC framework
  • A unit testing framework”
https://developer.marklogic.com/code
It is available on Github, and has become pretty popular among MarkLogic developers. No surprise, as it can accelerate development and deployment of a MarkLogic application enormously. If you take the cutting-edge ‘dev’ branch, you can even ‘capture’ an existing App Builder app, and start extending it with REST extensions very easily with the help of Roxy.

I am lucky to be on a team that includes the two biggest contributors of Roxy, not coincidently also its inventors: Dave Cassel, and Paxton Hare. For those interested to learn more about Roxy, make sure to check out the documentation, and all the blogs that are available online. There are plenty contributions and references on various personal blogs:
Most have been gathered on the wiki of Roxy:
https://github.com/marklogic/roxy/wiki/Tutorials
Stay tuned for more on my adventures at Vanguard. Looking very much forward myself!